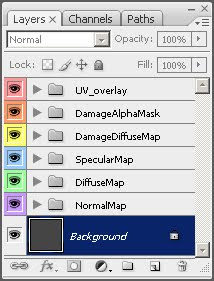
This is how my Folder structure inside of photoshops layer manager looks when working on textures for 3d models. I keep an empty PSD file (one with no images in it) on my desktop at a resolution of 2048*2048 set up with this folder structure in the layer manager. This way i always have this layer structure set up whenever im going to start a texture. The reason i make the image 2048*2048 is because i can always lower the resolution if i need a smaller texture (keeping note that you should always work with at least a double sized texture to your final result.
- This is where the UVW map (exported from your 3d application) should go.
- This is the "Alpha" or transparency maps should go. (*EDIT* this should be renamed to "OcclusionMap")
- This is where the damage texture should go (Usually an overly on the diffuse map).
- This is where the "specular" or shine map should go.
- This is where the "diffuse" or color map should go.
- This is where the "Normal map" should go.
- This is just a temporary background color.
Examples of the textures involved


No comments:
Post a Comment